Sunday, December 29, 2013

The Book Report Game: Can You Relate?

I recently took my students to see the play Charlie Brown Christmas performed by a local group in our area and was in stitches when they performed this scene:


I found myself making so many connections while I watched, especially with Lucy and her word counting strategy. Oh, how I hated the dreaded book report! I loved to read, but the book report was a necessary evil that I sometimes had to bear. 

I also started thinking about my own students and even my son. I looked around and noticed they didn't quite get it in the same way I did, and it's because they never write book reports. We use AR instead. So I began wondering how this particular scene would have gone if AR tests were substituted instead of a 100 word book report. 

DISCLAIMER: Before you read any further, please note that I am NOT against the Accelerated Reader program, or even the occasional book report. I'm not someone trying to ban any reward program from schools or classrooms. I believe that both can be used successfully in the hands of a skillful, thoughtful, and careful teacher/administrator. I'm just someone who really wonders what IS the best way to motivate readers, while still holding them to a level of accountability? I'm also not trying to overgeneralize. Many of my students love to read and actually love AR and challenge themselves with their own goals. I'm talking primarily about the hard-to-reach readers. 

With that said, I started thinking of all the ways that some students play the AR game (much like the Peanuts gang and our generation did with book reports). 

I imagine they might think or say something like this:

Lucy: 1, 2, 3, 4, 5, 6, more half point books until I reach my AR goal. Oops I made an 80, now I'll have to read three more to get my average back up!

Charlie Brown: I'm reading all my books, but never seem to have the time to take the tests. I work better under pressure, so maybe I'll just take all my tests at once.

Linus: Oh no! That book I read was way below my level! There aren't any books in the library on my level. Can I take a test on it anyway? 

Schroeder: I read a book by the same author (or watched the movie), so maybe I can try an AR test on this book and see how I do.

If someone rewrote the scene to include some of those lines, I think many students would make more connections. And that makes me sad because I haven't quite got the answer to the question at the heart of the issue:

How do you instill a love of reading, and yet ensure that students actually ARE reading? Can inspiration and accountability co-exist? I think the answer is yes, but I'm not 100% sure I know how to do it effectively with every child. 

Perhaps it's time to pull out The Book Whisperer again and reread it!

Comments? Connections? Suggestions? 

Thursday, November 21, 2013

Bringing Vocabulary Practice into the 21st Century

Here's a quick post to share something that was a huge hit today with my kiddos. Building vocabulary is a large part of our reading instruction. We talk about the words, make sentences with them, have collaborative conversations about them them, write about them...you get the picture. We do a lot with our vocabulary, but today I wanted to shake things up a bit. Enter....FakeiPhoneText.com.

If you haven't used this awesome website, you have to go check it out. It is really easy. Just type in a conversation, hit create, and your text conversation opens in a new web window. You can save the picture using your right click or copy the web link to post onto Edmodo, email, or wherever.

We have a class set of Kindles, so my students used them to create their fake text conversation. The only stipulation was that it had to make sense and include at least three vocabulary words. Once finished, they copied the URL of the fake text and posted it to Edmodo. Success! This activity was just the change we needed right now, and it provided the practice they needed.

It also gave me some very good feedback as to who was using the words correctly and who was not. Here are a few of our creations:

I can think of so many uses for this website, but I really loved using it for vocabulary practice today. Maybe next week we'll incorporate it in some other subjects. 

Tuesday, November 12, 2013

The Digestive System

A few weeks ago we wrapped up our study of the digestive and urinary systems and thought I'd share some of the activities we did. Since I'm in a new grade level this year, just about everything is brand new and I'm having to do lots of research and learning. It's been hard, but really rewarding. I absolutely LOVE to teach science, and had a blast doing these activities with the kiddos.

First up: Digestion in a bag: What happens to food as it enters your mouth and travels through your body? We modeled the process using a crackers, water, orange juice, paper towels, zip-lock bags, and our hands. Stephanie over at Teaching in Room 6 posted this awesome activity, and as soon as I read it, I knew I had to do it. What a blast! The kiddos were a little grossed out, but that's part of the fun, right?

The next day (amid cries of, "Mrs. Kilgo, please tell me this isn't going to be gross!"), I pulled out the Play Dough. Who knew the level of excitement a bunch of fifth graders would have at just the sight of Play Dough?! I put together four learning stations.

  1. Promethean flipchart on the board
  2. Build a model of the digestive system with Play Dough
  3. Links with videos and games to explore
  4. No Saliva, No Taste? experiment


Each child received a lab sheet (which you can snag for free here). We worked in groups at each station, with me guiding the last station. What a blast!

Do you have a favorite activity to do during this unit? 


Tuesday, August 27, 2013

Settling In--Favorite Routines

Day 7 of school is completed, and let me tell you...it has been a whirlwind! We're all settling in to a new grade level (myself included), and I have to say I LOVE fifth grade! It's been such a great experience to see how my kiddos have grown and matured over the summer, and I also enjoy learning new curriculum. (Yes, really).

I know many of you haven't yet started school so I wanted to share some of my favorite routines with you...Many of these are old favorites, but some of these I literally didn't learn until two nights before school started and I've implemented them easily. I knew I wanted to integrate more signals and group responses into my teaching and went searching. Here's my list of favorites:

Attention Signals:

  • Class/Yes (Teacher says "Class?" and students stop what they're doing, turn to teacher and reply "Yes?") I try and vary the way I say it.
  • Did you know there's a student response to the old "1, 2, 3, eyes on me?" I didn't until I watched a video the other day. Who knew? The students stop, turn, and look at the teacher and reply "1, 2, eyes on you!" I love it!
  • Super Scholar Style: I think this came from one of the videos below. When I say "Super Scholar Style" students sit up straight, clap twice, turn to look, and rest their hands on their desks or in their laps.
Hallway: "1, 2, 0" One line, Second tile, Zero talking. This is actually from a good teacher friend of mine from another school. There was a school rule there that required students to walk in a straight line on the third tile from the wall. The rule there was 1, 3, 0. At my new school, the hallways are a little more narrow so I changed it to "1, 2, 0." I love this procedure because it gives the students specific guidelines and visual reminders.

Restroom Sign-Outs: I used to use silent signals for restroom and water, but a few years ago I implemented a sign-out sheet. It's just a three-column chart labeled "Time Out, Name, Time In." Students are taught that they may sign the sheet and leave the room to go to the restroom as needed as long as I'm not directly teaching them. (For emergencies they just go!) They're expected to use our regular class restroom breaks, and use the sign out sheet sparingly. I've never had to say anything to them about overuse because they know it is a privilege. Our class restroom breaks are any time we are outside the room as a group: To and from PE, to and from lunch, to and from computer lab.We don't necessarily all line up and wait at the restroom during all of those times. If a child needs to go, they just get out of our line, go to the restroom, and join us when they're finished.

Hand Signals: This is one I've done for years for oral group responses. I say the question, hold my finger next to my temple (think time), then bring it down palm-up in front of me. When the hand comes down all children respond orally. Here are a few new ones I've incorporated this year. I absolutely love these signals! We've incorporated every one except for the "complete sentences" signal because I haven't had a need for that reminder yet and the "unsure" signal. This video is pretty amazing and details silent hand signals:

Whole Brain Teaching: Okay, this is not new for me, but I HAD to add it to the list because I use at least the Class/Yes routine and the scoreboard every year. This year, I'm hoping to add the multiplication practice portion.

Morning Meeting: Here's another favorite I've been doing for years, but the way I'm doing it this year has changed thanks another fabulous video from Mrs. Noonan:


Do you have a favorite? Maybe one of these above is a favorite of yous? 

Sunday, August 18, 2013

Back to School Sale!

Tomorrow is the first day of school for us, and I'm really excited to get back in the swing of things and be with my students. In honor of this awesome time of year, I'm joining TPT's sale. All of my items are 10% off.  Be sure and use the promo code to get the extra 28% off!

Tuesday, August 13, 2013

Tech Tuesday: Vocabulary and Spelling City

You know that tech tool that you don't think you could survive without in the classroom? One of my favorite online resources is Vocabulary and Spelling City. I know, I know, you've heard of it before...but have you used it lately? One of the great things about VSC is that they are constantly upgrading and adding features. Having met many of the company executives personally, I can honestly say that they really care about teachers, students, and education. They strive to create a valuable resource that enhances learning and makes management of activities a snap.

Here's one of my favorite new features:
See that red circle in the middle? VSC has a new feature that allows you to search for lists based on your state's standards and your grade level. Here's a sample of what I get when I search mine:
I love how it lists the standard, then the available lists in blue.

Another one of my favorite features is the Assignments. I created assignments all year last year for my kids and it was super easy. Best of all, you can easily differentiate instruction by assigning different tasks to specific groups of students. Here's a quick overview of the assignments feature:


Of course VSC has lots of great features that you can use for free, but the premium membership is well worth the cost. I've been using Vocabulary and Spelling City for years and can't imagine not having it. 

How about you? Do you have a favorite tech tool that you just can't imagine having to go without?  


Saturday, August 10, 2013

Classroom Reveal Part 2: Library Organization

Part two of my classroom reveal is all about the library. I happen to be a little obsessive about children's literature, and have amassed a pretty large collection of books. I had a pretty good system in place for organizing them, but was getting a little tired of all the multi-colored baskets, so I decided to streamline everything. Here's a peek:
I swapped out my colored baskets for white. I think this gives it a clean look.


I kept my books organized by genre, authors, etc... but I wanted the look to be color-coded but easier on the eyes. I decided to use a small space on my new basket labels for the color codes. From left to right, this is a close up:

I always get the question from other teachers or parents, "How do the students know where to put the books back?" My answer to that is coordinating book labels. I make matching stick-on labels that I print on Avery shipping labels. I had a super parent volunteer come to school and place the matching stickers on every single book in my room.

Finally, I went through a few ideas for attaching my labels to my baskets. I started with book rings, but didn't like how they looked and how they labels swung around. I decided to use plastic cable ties that I found at Big Lots for less than $1. Since my baskets are white they blend in pretty well.

If you're interested in my basket/book labels, you can find them in my stores on TPT and TN. They come with pre-made labels as well as a fully editable file of each color so you can add your own labels if you'd like. 

I'm so excited to have this section of my room finished, and love the way it turned out!

Friday, August 9, 2013

Classroom Reveal Part 1: Focus Wall

I've been working like crazy in my room, just like many of you out there in blog land, and finally think I'm almost done. Isn't fixing up the room so much fun? I just love organizing and decorating in preparation for the kiddos!

When you first walk in and turn left, you'll see my closet small group area. A few years ago I covered the closet doors with black sheets and added a cute polka dot border. This year I've added clothes pins (hot glue is my best friend) so I can easily change out the weekly skill/strategy posters.
My table is at the bottom of the picture.

Here's a close up view. See my clothes pins? (I spray painted them black).
Now, it is admission time. I love having my focus wall visible because I can refer to it often and it's a great reminder for the kiddos. However, I inherited a storage system for our previous series focus wall materials that just didn't work for me. All of the items for the week were put in manila envelopes, but the vocabulary cards were in a box, and I had to write the spelling words each week. Needless to say, I didn't keep up very well with this every week. Since we're starting a new program and a great friend of mine pre-made all of the focus wall materials for my grade level for the whole year I decided it was time for a new system:

Our new program didn't provide storage boxes or crates for our leveled readers, so I decided to put them in the pink, green, and blue crates. They're in that particular order for a reason. You see the ties on the curtains above? Those colors correspond, so I'll always know that pink holds units 1-2 materials, green holds units 3-4, and blue holds units 5-6. Here's a look inside the pink crate:

I love these crates because even though we have 4 sets of leveled readers for each week, I can easily fit two units worth of readers in them, plus all of my focus wall materials. The focus wall binder also serves as a divider between the two units. You can't tell from the picture, but there are also file folder dividers between each week's set of leveled readers. Here's a closer look at what's in the binder:

Let me say up front that I did not create these awesome resources so I can't share them, but my friend who created them will probably either place them on her website or maybe in her store. (She's still trying to decide if she wants to go the store route). I basically printed all of the materials, including spelling and vocabulary words and placed them in plastic sleeves in my binder. Each binder can hold 2 units worth of materials. When it is time to change out my focus wall, I'll take the full page resources out (sleeve and all) and clothes pin them to the wall. 

It did take some time to get all of this printed and put away, but I know that it will keep me efficient in the long run, and it is a system that will help me keep my focus wall up to date. How about you? Have you tried something like this before? Or do you have a different system that works for you? I'd love to hear your ideas. 

Friday, August 2, 2013

Student Blogging Challenge 2013

Are you looking for a way to connect your classroom to others while at the same time practicing communication skills? Have you heard of the Student Blogging Challenge? It's one of the many gems I've been exposed to thanks to Twitter. Let's face it. We live in a global community, and it's important for our students to make connections outside the four walls of our classrooms. They need to learn what it means to be a global citizen and how to communicate and collaborate with other cultures. Since my students already blog using KidBlog, I decided this awesome project would be a great opportunity to become even better bloggers.

It starts in September and consists of 10 weekly challenges for children to complete. September is good for my class, because we will have been in school already for a few weeks. If September doesn't work for you, they do another on in March. Each challenge is designed to help students become better bloggers AND write better comments, as well as write for an authentic, global audience. For some examples of the challenges, check out their FAQ page (scroll down).

I can't wait to get started with student blogging again this year! If your students aren't already blogging, this challenge is a great place for you to start. You can create free classroom blogs on KidBlog that are very easily managed. (Here's a post I wrote last year to help you get started).

Are you ready to try it yet? Click here to sign your class up! Hope to see you and your students in the challenge!

Tuesday, July 30, 2013

Honor and Gratitude

I've waited for several months to post this piece because I've been trying to sort my thoughts and words in a way that conveys exactly what I'm trying to say. Several months ago, I was honored to be named my school's Teacher of the Year. After that, I was named Teacher of the Year for my school system, then became part of Alabama's "Sweet Sixteen" when I was named the district 8 Teacher of the Year.  (We have 8 districts consisting of several school systems each in my state, and an elementary and high school teacher were named in each district).

I write this not to receive congratulatory comments, although I am very appreciative of all of the sweet words my friends have spoken to me, but rather to express my thanks and gratitude to my personal learning network. I received a great honor. But I feel that it belongs not just to me, but to all of those educators who have nurtured me, taught me, talked me through issues in the hallway and at lunch, sat next to me in workshops, etc...I am the teacher I am today not only because of my training and passion and desire to be better, but because of all the teachers who are a part of my circle.

From my own teachers in school who were beacons of hope and encouragement, who showed me how a great teacher interacts with students and colleagues. I often think back on them and recall their quiet smiles or snippets from their classrooms. To my Home Ec teacher in high school who let me be her aide and do bulletin boards and help me with scholarship applications and part time jobs. She is such a great influence. To my cooperating teacher during my student teaching all those years ago...I would be hard pressed to find a more caring, encouraging, compassionate person on this earth. Sometimes I still ask, "What would Nancy do in this situation?" To my coworkers...too many to name, but I will name a few anyway. Robin, who taught me how to be super-duper organized and was always a step ahead of me. Super helpful, she would bring me things that I didn't even know I need yet...but she knew. Thank goodness for her! Dana, who was my sounding board and partner during Masters classes and beyond. Creative, artsy, and just plain fun! Connie, who is about fifty times smarter than me (although she would never think that), who trained me as a Reading Recovery teacher and became a great friend in the process. To Melissa, who is super encouraging, smart, and a fabulous mentor. To Cara, who I share a brain and almost a name with. We've worked closely together for years and I don't know where I'd be without her! And there are so, so, so many more. If I wrote this in a novel (which I nearly have) I couldn't list everyone. Please know that if I know you personally or have corresponded with you online, you are on the list!

My point is this: I wish I could share this honor. Because I didn't get here on my own. Each time someone says, "Congratulations," I am reminded of all the people on my list who helped me on my journey. I am the teacher I am today because of the influences in my life, and I am thankful to God for them.

Monday, July 29, 2013

Monday Made It: Teacher Binder

Two weeks from today, I'll be reporting back to school with the rest of the teachers in my district, and I can't believe how quickly the summer has flown by! I've really got to buckle down and get my head together, which is why I've been working for the past week on my new teacher/sub binders. I don't know about you, but there's just something about having an organized teacher binder that makes me feel like I'm ready to start a new year. I just get this happy feeling when I start to put my new binder together. 

Add that to my love of blue, green, brown, and birds and I've created an epic binder set. It includes a 2013-2014 calendar, pre-made dividers and forms, PLUS a file with every single page blank and editable!


Includes every page in the teacher and sub binder files, but they are blank and editable!


You can grab yours at Teachers Notebook or TeachersPayTeachers

I'm linking up with Tara's Monday Made It linky party. You can check out other teachers' great projects here


Monday, July 22, 2013

Monday Made It Freebie

I just love all of the great ideas and cute things I get to see on the Monday Made It linky! I've been going a little crazy making labels for my classroom and wanted to share the love with my bloggy buds:  Editable classroom labels in a polka dot and vertical striped theme:
Grab your copy here!

If you download it, please leave me a comment. I'd love to hear how you're using them. Check out the other awesome projects by visiting Tara's linky:


Thursday, July 18, 2013

Covering Up The Clutter

I'm all about hiding the clutter in my classroom. Even if everything is neatly organized and labeled, I just don't like to look at it. For the past three years I've had a green bed sheet hanging from my ceiling to cover up that organized mess you see below, but this year I decided to make it a little cuter. Armed with 6 1/2 yards of blue fabric, my handy hot glue gun, bulletin board cuties, pvc pipe, wire, and of course my awesome hubby, we set to work! It's not completely finished yet. I plan to make paper frames for my three years of class pictures and add them to the scene, as if they're flying through the air in a bird's beak. I want to add the class picture to the scene each year.


Here's another one of my pet peeves...the backpack area. Oh, I know the kiddos have cute backpacks, but I despise looking at them all jumbled up and hanging in plain sight. My solution was to make these cute curtains to cover the mess!


And finally, the project that I actually sewed. After "living" in my room for three years I finally decided what type of curtains I wanted to make. They don't actually hide anything, but I absolutely LOVE the colors and the polka dots! 
Sorry about the bad picture!

151 Leading Sites for Elementary Educators


I'm so excited to have made the list on 151 Leading Sites for Elementary Educators! If you've never visited, you simply must check it out. They have links to teacher blogs and web tools, and everything is neatly organized by category. You can visit by clicking on the image below:


Monday, July 15, 2013

Monday Made It: Library Labels

Finally! I've finished a Monday Made It project. Last summer I went crazy making things all summer long, but this year I've been so busy I'm just now getting to sit and be creative and crafty. My first order of business was to revamp my classroom library labels. I was getting pretty tired of the different colored baskets (green: nonfiction, red: chapter book series, etc...) Plus the red baskets really clashed with the pink cabinetry in my room. Please don't tell me I'm the only one that would be bothered by red baskets and pink cabinets together! I had two options: replace my red baskets with another color or swap out my colored baskets with the white ones in my attic and replace the labels. I decided to go with new labels to match my polka dot theme. And here you have the result:

My library sections will still be color coded, but since the labels are similar there will be a more cohesive look to the library. I plan to use green for informational, pink for chapter book genres, blue for chapter book series, purple for authors, and orange for picture book genres.

I started placing matching stickers on the backs of books many years ago so the students could easily return books to the correct baskets, so of course, I had to make new ones to match my new labels! I print them on Avery 1563 shipping labels. Two book labels print on each shipping label, so I just cut a straight line down the middle of the labels, then stick them on the backs of my books.


I included 120 labels, plus sheets of book labels that match all 120 basket labels. I've also included editable files in each color. If you're interested, you can find them in my store by clicking here

I also decided to make a file of simply blank labels while I was at it:
Find it here.

Want to see some other great projects? Check out Tara's awesome linky:

Saturday, July 6, 2013

Camellia Net: Alabama's Digital Library

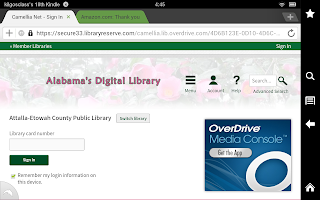
Alabama readers, check this out! If you're looking for e-books Camellia Net is the place to go. Camellia Net (Get it?...our state flower) is Alabama's Digital Library which connects libraries all across the state. All you need is a library card to sign up and you can borrow books. I first heard about this service from a friend at a Christmas party last year, but didn't look at it right away. I then got busy and forgot about it until yesterday. My sister reminded me and even went through the site with me, so I decided to give it a try on my Kindle Fire HD. Here's what I found:

Go to the site, and choose your library. To sign in, type in your library card number.I had to do a little treasure hunting to actually find my card!

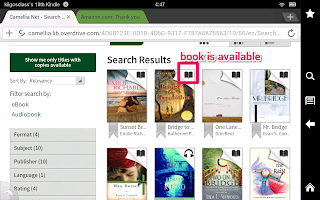
Search in the search box, or browse by genre.
You're allowed to borrow five books at a time. Each title has an icon in the upper right corner. If the icon is darkened, it is available for check out. If it is gray, you can place it on hold and an email will be sent to you when it is available. 

Tap the book you'd like to borrow and tap "Borrow." 

You'll be given two options: Download or Read in Browser. I chose to download my book and was sent to the Amazon store where I had to choose which device to have the book delivered to. You can also see in the bottom corner that it shows I have two books checked out. After you've finished reading, you can just return the book.

If you're like me, you've probably heard of this before and maybe got a little side-tracked and forgot about this awesome service. Well, here's your reminder! Go log in now before you forget :)

If you're still reading and from another state, congratulations!!! I didn't want to leave you out, so I will tell you that I did a quick Google search and found that most states have a similar system in place.

Saturday, June 29, 2013

No App? No Problem! Adding Tiles to Your #ISTE13 Surface


Like countless other educators, Cara and I were super excited to receive a free Microsoft Surface RT while we were at ISTE. We started playing with it that very night, but with the rush of ISTE I wasn't able to really dig in until I got home. One of the first things  I tried to do was find a Twitter app such as Hootsuite, but there are none I like as of now. The Windows store is still really new, but I wasn't willing to wait, so here's what I did. I opened a web version of Hootsuite and saved it as a tile on my start screen. Now, even though I don't have the app I'm able to use it from my device with one tap. Here's how:

Quick note: For this tutorial I began in the desktop version of IE, not the IE tile on the start menu. The desktop version saves a tile that has a small picture on it and will also open in desktop mode. I will post how to do the start menu version shortly.

Step 1: Open the site you wish to have access to on your start menu. I used Hootsuite.
 
Step 2: Tap on the wheel in the upper right corner.
 
Step 3: Choose 'Add Site to Start Screen.'


Step 4: Tap the add button.


Your new tile will appear at the end of your other tiles. You can move it around by using a quick swipe down to select it, then dragging it and dropping where you'd like it to be.