Saturday, February 18, 2012
Cool Tools
I just stumbled on this awesome wiki, Cool Tools for 21st Century Learners, that has several technology tools organized by type. There are sites for avatars, presentation tools, copyright-free images, search engines, and more...
Clicking on a category takes you to a list of those tools. I love how this wiki is organized! If you're looking for some tech tools, stop by and check it out.
Thursday, February 16, 2012
"Whole Group" is Not a Bad Word
We seem to be teaching in a time when the phrase "Whole Group" is almost akin to an ugly word (ranking close behind "worksheets"). The trend is to teach everything in small groups while saving whole class instruction for short mini-lessons. So, against my better judgement, I have tried for several weeks now to teach our reading curriculum as it was "meant" to be taught (according to the training I've received). I have spent very little time (20 or so minutes) each day in whole group instruction and pulled small groups to deliver the meat of the curriculum, i.e. the reading story and skill practice for the week. Yes, you read that correctly. I'm supposed to pull four groups a day and read the same story and practice the same skill with each group. But it gets better---I don't have to read the entire story with each small group, only the pages that relate to the skill. They can read the story during their independent work time.
So basically, what we have is a very similar lesson done four times a day in ability-level groups. Sure, the lesson is differentiated in the scaffolds I use, the leveled readers, and word study skills, but the objectives are the same.
You may ask what the other kids are doing during this time? They are reading, writing, or working on a related task that goes with our skill or story for the week---all very valuable things for them to do, but they're doing them alone. For a long time.
I'm not against small groups as a differentiation method for some students who need to be retaught or shown in a different way, but for EVERYONE? To deliver CORE program content? The scenario above is not only inefficient, it is unnecessary. And according to my students' test scores during said trial, it is not working. Not in my classroom anyway.
In my mind it makes much more sense to teach the core content in a whole group setting, then differentiate instruction only for the students who need it. Those needy kids get it at least twice that way!
I think balance is the key. Interactive, engaging whole group instruction is not bad...It's even beneficial!
When it comes right down to it, I'm not going to spend 80 minutes a day in small group instruction delivering similar content just so I can say they were taught in a small group. I'm going to read our basal story with the entire class, because I think it is important that we share it together as a community and bounce ideas together. And finally, I'll pull small groups on an as-needed basis.
In short, I'll go back to what I was doing before my experiment!
So basically, what we have is a very similar lesson done four times a day in ability-level groups. Sure, the lesson is differentiated in the scaffolds I use, the leveled readers, and word study skills, but the objectives are the same.
You may ask what the other kids are doing during this time? They are reading, writing, or working on a related task that goes with our skill or story for the week---all very valuable things for them to do, but they're doing them alone. For a long time.
I'm not against small groups as a differentiation method for some students who need to be retaught or shown in a different way, but for EVERYONE? To deliver CORE program content? The scenario above is not only inefficient, it is unnecessary. And according to my students' test scores during said trial, it is not working. Not in my classroom anyway.
In my mind it makes much more sense to teach the core content in a whole group setting, then differentiate instruction only for the students who need it. Those needy kids get it at least twice that way!
I think balance is the key. Interactive, engaging whole group instruction is not bad...It's even beneficial!
When it comes right down to it, I'm not going to spend 80 minutes a day in small group instruction delivering similar content just so I can say they were taught in a small group. I'm going to read our basal story with the entire class, because I think it is important that we share it together as a community and bounce ideas together. And finally, I'll pull small groups on an as-needed basis.
In short, I'll go back to what I was doing before my experiment!
Wednesday, February 15, 2012
Blessed to Have Back-Up
Today I was reminded yet again of how truly blessed I am to be working in such a great community. I had to have a strong "talking to" with three of my students who refused to stay on task during independent work. I was really disappointed in them, and took them out in the hall to speak with them. They each had notes sent home today to be signed and returned tomorrow. Here's where it gets good...
I've already heard from two of the parents--one happened to walk up during the "talk" and had a talk of her own with said child. The other parent emailed right after school to get the "real" story because she felt like her child didn't give her all the information--then THANKED me for filling her in.
I am so blessed to be working in a community that still believes in teachers. They know I'm not perfect, but thank goodness they will back me up. It is very nice to have the feeling that we are working together as a team. These parents not only care about their students' educations, but their behavior in and out of school as well.
I've already heard from two of the parents--one happened to walk up during the "talk" and had a talk of her own with said child. The other parent emailed right after school to get the "real" story because she felt like her child didn't give her all the information--then THANKED me for filling her in.
I am so blessed to be working in a community that still believes in teachers. They know I'm not perfect, but thank goodness they will back me up. It is very nice to have the feeling that we are working together as a team. These parents not only care about their students' educations, but their behavior in and out of school as well.
Saturday, February 11, 2012
Teaching in the one-iPad Classroom
- Small group instruction-There are countless apps that can be downloaded for free or at very little cost that are beneficial for a small group of 4-6 students to work on together. During my small group math instruction, I've used Coin Math and Math Drills Lite. The children at the small group table take turns (round-robin style). While one child answers the question/problem on the iPad, the others work it on white boards or with money manipulatives. The iPad gets passed around the table in a clockwise motion and we continue this until everyone has had at least 2 turns.
- Paired with Document Camera-I'm fortunate enough to have a Promethean ActiView camera in my room, so many times, I've simply placed my iPad under the document camera and projected the image onto our ActivBoard. One or more students can take turns clicking the iPad. I especially like to show BrainPop's featured movie using the BrainPop app. I've also used Grammar Jammers in this way.
- As a Center Activity-If it's not being used with small groups (or maybe after we've finished), sometimes I allow small groups of students to take turns playing games on the iPad in groups of 2-4. (I love this idea for school-purchased iPads, but as the one I have is my personal iPad, I do this sparingly). Some of the apps I've used in this way are Crazy Tangram and Rocket Math.
- As an Interactive Slate-With the Splashtop app ($4.95), I can control my computer with my iPad. This allows me to walk around the room and use my iPad as an interactive slate. Instead of having students come to the board to click, drag, write, ect...They can do the same things from their seats on my iPad! This allows for even more interactive lessons because of the time efficiency. Let me explain...previously if a page on my flipchart lesson called for something to be revealed by clicking, I found that having a student walk up to the board, click the object, then walk back was not very efficient and slowed down the momentum of the lesson. Therefore, I simply clicked it and moved on. Now, I can give that control back to the students as I move around the classroom.
- As a Student Response System-With Promethean's free ActivEngage app, students can respond to questions using the iPad, rather than ActiVotes, ActivExpressions, or other mobile devices. ActivEngage works right alongside the other devices and groups of 2-4 students can "share" the iPad when choosing their answer. One desk grouping could use it (3 desks are in a group in my room), then pass it to the next group for the next question. This allows for more active engagement and collaboration. It reminds me of the "Think Pair Share" strategy we use in reading. I've yet to try this out in my classroom, but I've explored the app and this is definitely on my To-Do List.
Friday, February 10, 2012
Tech Tools: Weebly
Ten-year-olds designing a website? You bet! With a free account from Weebly and about 45 minutes, even a novice can create a website. It is very easy to use, offers many flexible templates, and allows users to upload or link content with a few clicks of the mouse.
My students literally put this website together in less than an hour today! Here's how:
Go to Weebly and create a free account. Log in and choose a name for your site.
Click on your site's name to edit.
Create and change to your heart's content, then click Publish. You're done!
I introduced this tech tool to my students as a way for students to build background for a story we're reading next week. I set up the account, then assigned groups of students to work on each page within the site. Not only did they learn a lot about Ancient Egypt, but they were able to create content and learn in the way that suits many of their learning styles. Win-Win!
My students literally put this website together in less than an hour today! Here's how:
Go to Weebly and create a free account. Log in and choose a name for your site.
Click on your site's name to edit.
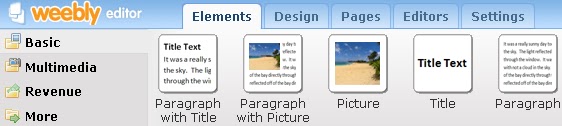
Use the tabs on top to change your site's design, add pages, and choose elements to add such as text or pictures:
Drag and drop page elements onto your page. You can edit them right on the page!Create and change to your heart's content, then click Publish. You're done!
I introduced this tech tool to my students as a way for students to build background for a story we're reading next week. I set up the account, then assigned groups of students to work on each page within the site. Not only did they learn a lot about Ancient Egypt, but they were able to create content and learn in the way that suits many of their learning styles. Win-Win!
Wednesday, February 8, 2012
Museum Box Update
Last week for Digital Learning Day, I introduced Museum Box to my students (More here). They were so excited! All in all it was a good experience. There were pros and cons with this tool, just as with many others out there, and there was a definite learning curve for me and the kids!
The original plan was for groups of 3 to make one cube that would be included in one class box. However, when we got started, I didn't know that I would have to have each group load the same box. They all wound up working on their own box instead of one cube.
Want to try it with your kids? Here are some things you might want to know first:
Pros:
- Bright and colorful
- Icons are kid-friendly
- Print is large
- Easy to learn and navigate
- Allows you to add links, pictures, videos, and text
- Searchable database of images and sounds
- Very easy for teacher to approve, reject, or edit boxes once they're submitted
- FREE
Cons:
- Sometimes the colors that students used within the text boxes and saved didn't show up on the cube the way they were designed.
- If the text that students created needed to be edited and was already placed on a side of the cube, you could re-save the text, but not add it immediately. There would be an error message on that side of the cube and you'd have to go back in and add it again.
- The "Clear All Sides" button is too close to the "Clear This Side" button, causing many mistakes and complete do-overs.
- Found pictures, videos, and files must be uploaded. They can't simply be linked.
- When adding a link, say to a video, the image of the website didn't necessarily look like the website's linked page.
With all of that said, I will definitely use it again. There were a few issues, but it was still a fun learning experience for both my students and for me. Here are a few samples my kiddos created:
Hope you enjoy!
Happy creating!
Saturday, January 28, 2012
Museum Box
What's a Museum Box? This FREE virtual display box is a presentation tool that allows students to incorporate text, images, videos, links, and pictures. Each of the 8 sections of the box are cubes that unfold to have 6 faces:
To each face you can add text, pictures, links, videos, sounds, or even files:
There are 3 layers to each box, which means a total of 24 cubes:
So, how can you use it? I plan on introducing it to my class on Digital Learning Day, which is Wednesday, February 1. As a class, we'll make 1 museum box, filling the first 8 cubes. (We'll just do one level this time). I have 24 students, so I'll divide them into groups of 3 and each group will have one cube from our box to work on. Our topic will be Chapter 8 in our state history book, which covers The Great Depression, New Deal, and World War 2. (I know...quite a lot for one chapter). Each of the 8 groups will have a topic from our chapter to research and fill their "cube" with information to share. I haven't decided yet if I'll assign the topic or subtopic or let them choose for themselves. I tend to let them choose for themselves because it is highly motivating, but I suspect they'll be motivated regardless because of this awesome new tool.
Once we're finished, I'll post it here as an example. This is a really great tool for students and I think it will be easy for them to use. The layout and large graphics will make it very kid-friendly.
Have you used it? Are you planning to? If so, drop me a line and share! I'd love to see how others are using Museum Box!
To each face you can add text, pictures, links, videos, sounds, or even files:
There are 3 layers to each box, which means a total of 24 cubes:
So, how can you use it? I plan on introducing it to my class on Digital Learning Day, which is Wednesday, February 1. As a class, we'll make 1 museum box, filling the first 8 cubes. (We'll just do one level this time). I have 24 students, so I'll divide them into groups of 3 and each group will have one cube from our box to work on. Our topic will be Chapter 8 in our state history book, which covers The Great Depression, New Deal, and World War 2. (I know...quite a lot for one chapter). Each of the 8 groups will have a topic from our chapter to research and fill their "cube" with information to share. I haven't decided yet if I'll assign the topic or subtopic or let them choose for themselves. I tend to let them choose for themselves because it is highly motivating, but I suspect they'll be motivated regardless because of this awesome new tool.
Once we're finished, I'll post it here as an example. This is a really great tool for students and I think it will be easy for them to use. The layout and large graphics will make it very kid-friendly.
Have you used it? Are you planning to? If so, drop me a line and share! I'd love to see how others are using Museum Box!
Friday, January 27, 2012
Inspiring or Instructing?
What goes on in your classroom? Do you inspire or instruct? As I reflect back on the week, I have to say I've done a bit of both. The light in one child's eyes as he showed me a book he searched out on his own to read simply because we're reading and learning about Houdini; the PhotoStory another child made about World War 2 (current history topic); the excitement from my Gifted students when I had them make a project to "show" symmetry instead of participating in the lesson with the rest of the class...these are the inspiring moments. These are the times that I cherish and want to have more of. So I asked myself, what's the common thread? In most cases, its technology.
How to get more moments like those? These kids truly are digital learners. We've got to teach them the way they learn.
- I taught my kids to make Prezis about Houdini (current reading story). These same children who would normally "tune out" started spouting information about Houdini that I didn't even know! They found it by themselves because they were inspired and excited.
- In History, I often show videos or have interactive flipcharts with ActivExpression quizzes or responses.
- My Gifted kids were using the digital camera to go around the school and take pictures of things that are symmetrical.
How to get more moments like those? These kids truly are digital learners. We've got to teach them the way they learn.
Thursday, January 26, 2012
Math Live
I can't wait to use this resource tomorrow at school! I just stumbled upon it a few minutes ago...what a gem! There are engaging, interactive videos dealing with numerous math topics. There are even links for each lesson to additional practice! We're going to try out the one about ordered pairs tomorrow. I'm looking forward to sharing it with the kiddos!
Subscribe to:
Posts (Atom)